How you can build this:
Shopify Object Viewer for Zendesk
written by Albert Ho
In this article, you're going to build an app that runs on Zendesk.
It's going to do one thing and one thing well:
When you load a ticket in Zendesk, the app will retrieve the ticket requester's Customer object (matched by e-mail) from Shopify and display it to you on the sidebar.
In this article, you'll first build it in the standard (traditional) way. Then in a future article, you'll build exactly the same thing, but without having to code.
The Traditional Way
First make sure you have Ruby installed:
$ ruby -vIf not, then install Ruby with rbenv:
$ brew install rbenv
$ rbenv install 2.7.2
$ ruby -v
Then install some Ruby dependencies for building Zendesk apps:
$ gem install rake
$ gem install zendesk_apps_tools
Initialize your project:
$ mkdir shopify_customer
$ cd shopify_customer
$ zat new
$ zat server
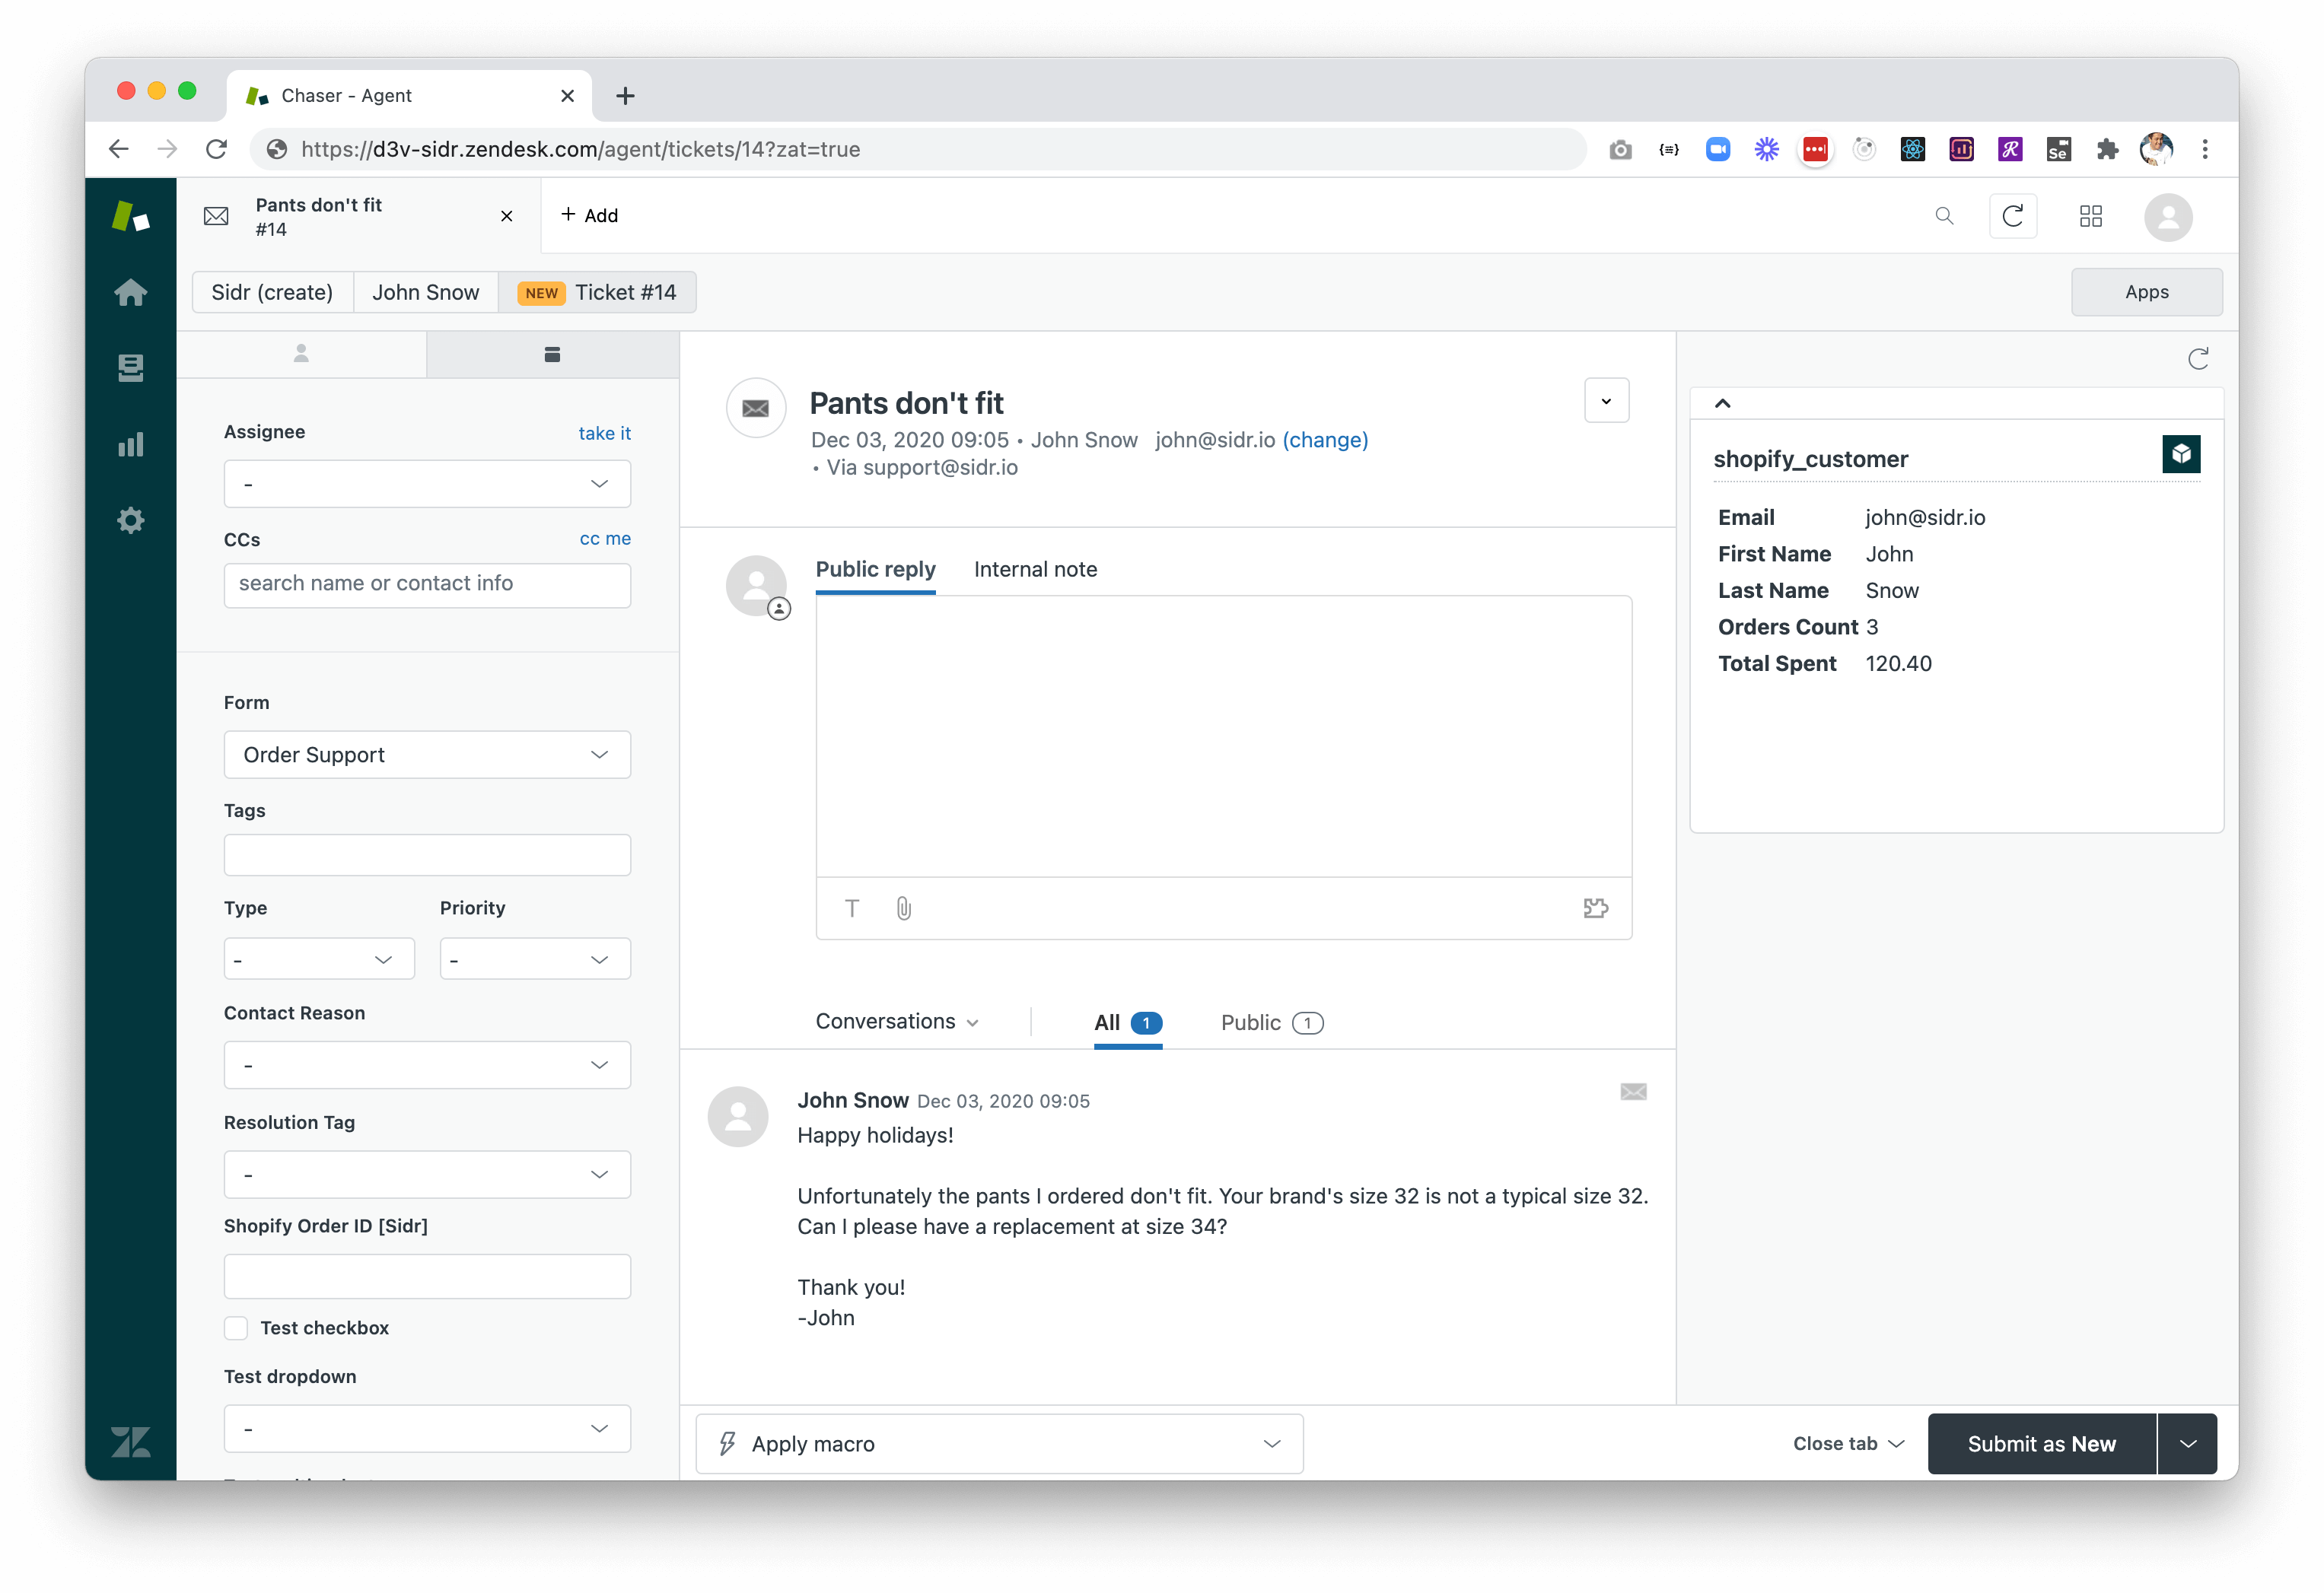
In any ticket in Zendesk, append ?zat=true to the URL bar, to get a URL that looks like this:
https://your-subdomain.zendesk.com/agent/tickets/90210?zat=trueYou should now see your empty app in the sidebar:
Next you plan out how this app is going to function. To achieve your goal, it's going to have to:
- Grab the e-mail address of the requester of the Zendesk ticket that's currently open
- Get the Customer object in Shopify that has the same e-mail as the one from (1)
- Display the important parts of (2) as a table in the app
Seems like a simple 3 step process right? But how?
You do a bit of research and peruse some documentation, and then come to conclude that you'll need to execute the following sub-steps:
- Grab the e-mail address of the requester of the Zendesk ticket that's currently open
- Use the Zendesk Apps Framework v2 to retrieve the current ticket's requester e-mail
- Get the Customer object in Shopify that has the same e-mail as the one from (1)
- Generate an API key or OAuth with your Shopify admin
- Use the Shopify API to search for a customer with the same e-mail as the result of (1)
- Display the important parts of (2) as a table in the app
- Build an HTML table showing the object's chosen fields
Start with (1). In your project, open assets/iframe.html, and add the following lines anywhere in the script block after client is instantiated:
var client = ZAFClient.init();
...
client.get('ticket.requester.email').then(data => {
  const email = data['ticket.requester.email'];

  // TODO: use email to retrieve Customer object on Shopify (2)
  // TODO: display parts of Customer object in table (3)
});
You've just used the Zendesk Apps Framework (ZAF) to get the current ticket's requester e-mail. Notice that you also add a couple TODO placeholders in the callback for doing (2) and (3).
Now fill in for (2). For this step you'll need to first authenticate with your Shopify store. You can do this a couple different ways: generate an API key or OAuth. To move quickly through this, visit the following part of your store admin to create a private app and generate an API key that has read access to Customers.
https://your-subdomain.myshopify.com/admin/apps/privateYou should come out of this with:
- API key - referenced from here on as
SHOPIFY_API_KEY - Password - referenced from here on as
SHOPIFY_API_PWD
Then go back to assets/iframe.html. In place of the TODO for (2), you hit Shopify's Customer search endpoint:
client.request({
  url: 'https://your-subdomain.myshopify.com/admin/api/2021-01/customers/search.json?query=email:' + email,
  headers: { 'Authorization': 'Basic ' + btoa(SHOPIFY_API_KEY + ':' + SHOPIFY_API_PWD) },
  cors: false,
  type: 'GET',
  dataType: 'json',
}).then(res => {
  console.log(res.customers[0]);
});
NOTE: you use the client.request() function from the Zendesk Apps Framework with cors set to false in order to proxy the request through Zendesk. If you try to do this with a browser fetch() or XMLHttpRequest, you will get a CORS policy block when attempting to hit Shopify's API.
Now, as long as the requester's e-mail on the current Zendesk ticket matches the e-mail of a customer you have in your Shopify store, you should see the Customer object print in the console log!
{
  "id": 4478754783429,
  "email": "john@sidr.io",
  "accepts_marketing": false,
  "created_at": "2020-11-29T18:19:38-05:00",
  "updated_at": "2020-11-29T18:23:32-05:00",
  "first_name": "John",
  "last_name": "Snow",
  "orders_count": 3,
  "state": "disabled",
  "total_spent": "120.40",
  "last_order_id": 3088973299909,
  "note": null,
  "verified_email": true,
  "multipass_identifier": null,
  "tax_exempt": false,
  "phone": "+16176958234",
  "tags": "sidr-sample-data, VIP",
  "last_order_name": "#1015",
  "currency": "USD",
  "addresses": [
    {
      "id": 5482552950981,
      "customer_id": 4478754783429,
      "first_name": "John",
      "last_name": "Snow",
      "company": null,
      "address1": "250 Tremont St.",
      "address2": null,
      "city": "Boston",
      "province": "Massachusetts",
      "country": "United States",
      "zip": "02116",
      "phone": "+16176958234",
      "name": "John Snow",
      "province_code": null,
      "country_code": "US",
      "country_name": "United States",
      "default": true
    }
  ],
  "accepts_marketing_updated_at": "2020-11-29T18:19:38-05:00",
  "marketing_opt_in_level": null,
  "tax_exemptions": [],
  "admin_graphql_api_id": "gid://shopify/Customer/4478754783429",
  "default_address": {
    "id": 5482552950981,
    "customer_id": 4478754783429,
    "first_name": "John",
    "last_name": "Snow",
    "company": null,
    "address1": "250 Tremont St.",
    "address2": null,
    "city": "Boston",
    "province": "Massachusetts",
    "country": "United States",
    "zip": "02116",
    "phone": "+16176958234",
    "name": "John Snow",
    "province_code": null,
    "country_code": "US",
    "country_name": "United States",
    "default": true
  }
}
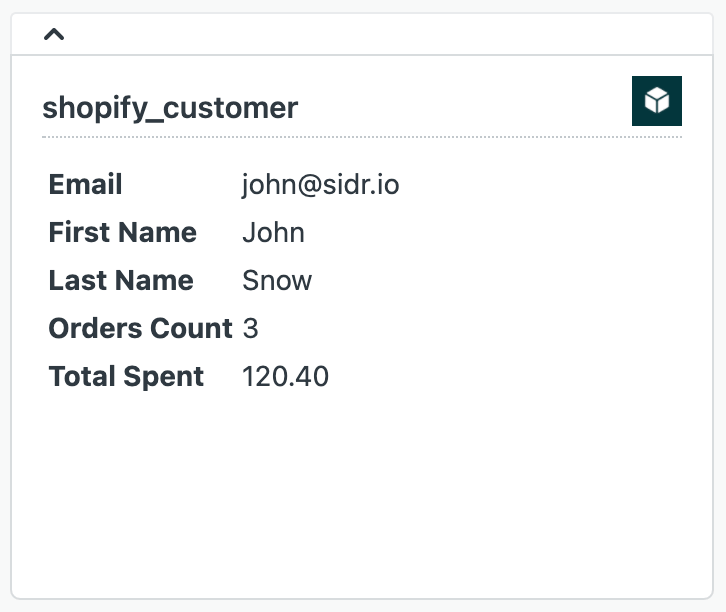
Whew, finally on to step (3): populating some of the Customer object fields into a table in the extension app. From the Customer object response above, you might take an interest in seeing the following fields:
- first_name
- last_name
- orders_count
- total_spent
You can always display more (or less) later, but for now you figure your Ops team will appreciate seeing this info pull up for any Zendesk ticket.
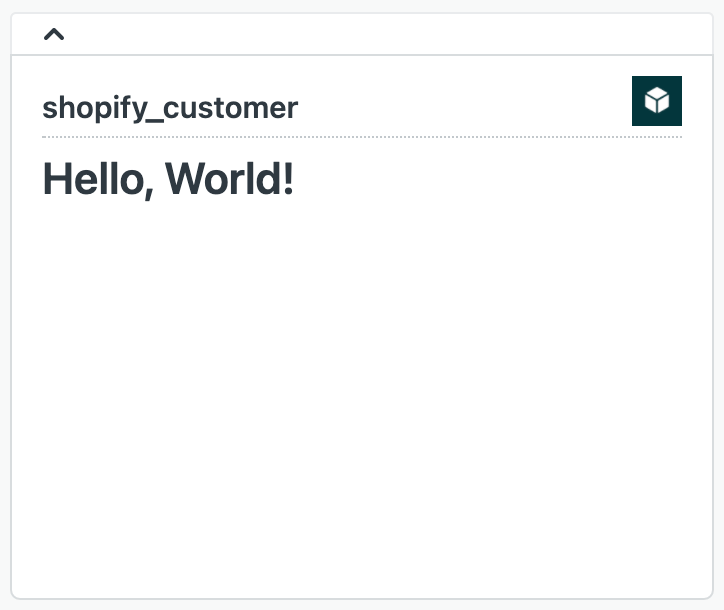
Go back to assets/iframe.html and in place of the "Hello, World!" line, add a table to display these Customer object attributes:
<!--<h2 className="u-semibold u-fs-xl">Hello, World!</h2>-->
<table>
  <tr>
    <td><strong>Email</strong></td>
    <td id="email"></td>
  </tr>

  <tr>
    <td><strong>First Name</strong></td>
    <td id="first_name"></td>
  </tr>

  <tr>
    <td><strong>Last Name</strong></td>
    <td id="last_name"></td>
  </tr>

  <tr>
    <td><strong>Orders Count</strong></td>
    <td id="orders_count"></td>
  </tr>

  <tr>
    <td><strong>Total Spent</strong></td>
    <td id="total_spent"></td>
  </tr>
</table>
Then finally, in the script section, in place of the console.log you added earlier, have that callback grab the fields from the Customer object and place them in the table you just created:
// console.log(res.customers[0]);
const customer = res.customers[0];
[
  'email',
  'first_name',
  'last_name',
  'orders_count',
  'total_spent',
].forEach(f => {
  document.getElementById(f).innerHTML = customer[f];
});
As you can see, building an app on top of a SaaS platform like Zendesk is quite different. Unlike building an app for the web, you have to build within the SaaS platform's context, where they impose their own rules and limitations. You may sometimes need to code in a specific language, or other times you may be prohibited from using your own UI components, limited to those provided by the SaaS platform. You may even find that sometimes the Developer API is rich for one type of object, and sparse for another type on the same SaaS platform.
Here are a few topics we left out in this article, but we'll cover these in a series of future posts (links will become active here as we write them):
- Packaging: build the app for production
- Deployment: what you need to serve your extension app in production:
- Choose where you'll host this
- Protect your secrets
- HTTPS
- Distribution: submit to the Zendesk app store if you want to make it publicly available
- Analytics: watch what people are doing on your extension app
- Error logging: know when failures occur when people are using the app
- React/Redux: use a more popular framework for faster/better development
- Data: store and use data for your app persistently
- Security: zip it all up so no one can break into your app
- How to do all this without code: everything we do in this whole series, in 5 minutes, without having to know how to code
To follow along and learn from future articles, leave your e-mail in our waitlist below and we'll keep you posted!